This is the third of a series of articles by bird photographer Mike Atkinson aimed at introducing more people to this wonderful hobby.
I am often asked what equipment is needed for bird photography. This is a difficult question to answer because it depends on so many factors:
- what birds you want to photograph (rarities, common birds, captive birds, etc.)
- what you want from your photos (record shots, photos for web publishing, photos you can sell, etc.)
- what you're physically able to lug around and use (some high-end gear is very heavy and unwieldy)
- how much you have to spend.
For this article, I'll start by describing the choices I made, the reasons for these and the lessons I learned, and then make some recommendations for anyone just starting out now.
Firstly, though, I should say that, although equipment is important, it's only one of many factors involved in producing good bird images, so don't get too hung up on this. (If you're anything like me, I'm sure you'll ignore this advice!)
My experience so far
Phase 1: Film photography
As part of my general interest in photography, I've had a variety of film cameras for over thirty years, from basic compacts up to SLR (Single Lens Reflex camera) outfits. Since my other main interest was in birds, I tried on numerous occasions to capture their beauty and variety on both print and slide film. I failed miserably and, due to the prohibitive cost of the film itself, plus the almost total absence of feedback (waiting a week to see the results), I just didn't make any progress on improving my abilities.
Lesson: Just don't bother with film at all.
Phase 2: Digiscoping
I finally managed to get hold of a decent compact digital camera (a Nikon Coolpix 4300) four years ago, mainly for taking family photos. I later heard about the technique of using cameras like this to take photos through spotting scopes, i.e. digiscoping, and got very excited at the opportunity to combine my interests in birds and photography once more.
I spent a few months fiddling with different settings and making minor improvements, but realized I'd need to invest quite a bit more to get any worthwhile results: better scope, better tripod and better camera (with adapter, cable release and other bits of kit).
At the same time, I was reading widely about bird photography and looking at all the photos being posted to BirdGuides. This really got me hooked and I realized that I was getting more of a buzz looking at high-quality images of even common birds than distant shots of rarities. Given my limited budget, I knew I had to decide between upgrading my digiscoping kit and investing in the Digital SLR (DSLR) route.
The deciding factor for me was a day spent trying to photograph a Red-throated Diver three years ago. On a small country park lake, this bird was surfacing anywhere from 20 to 200 feet away but, try as I might, every time I got my scope and camera set up on the bird, it submerged again. At that rate, I could have spent a week there without a single worthwhile image. I felt as though my equipment was working against me, not with me, and that taking the digiscoping route would have me battling against something that wasn't meant to be. That same evening, I ordered a DSLR with the longest lens I could afford.
Lesson: Understand the type of photos you want to take and then choose the technique accordingly. I know only one photographer who has mastered both Digiscoping and DSLR bird photography, so you should concentrate on just one of these techniques.
Phase 3: Digital SLR and cheap lens
At the time, the entry-level DSLR getting the best reviews was the Nikon D70. Having bought this (body only), my budget had virtually gone and I could only afford an £89 Nikon 70-300mm G zoom lens. It didn't matter: I was in heaven, blasting away at every bird I clapped eyes on, then transferring the images to my computer and learning how to get the most out of them with an early version of Photoshop.
Over the following few months, though, I came up against three problems. I'd expected the first two: the quality of the lens was poor and, at only 300mm, I was struggling to get big enough images of the birds, especially smaller and shyer birds. The third problem was more of a surprise: the light levels through the British winter drop so much that bird photography becomes very difficult. If you open your lens to the maximum aperture, you get the poorest quality; if you turn up your ISO sensitivity, you get too much digital noise; if you choose a longer shutter speed, you get blur due to 'camera shake' and subject movement. I felt as though I would have to hang up my camera for six months of every year.
Lesson: Getting hold of any DSLR gear will help you to find out whether bird photography pushes your buttons. If it doesn't, you can either use your DSLR for general photography or sell it without much of a loss. If it does, you will learn very rapidly what works and what doesn't, and will have a lot of fun in the process.
Phase 4: Digital SLR and mid-range lens
To overcome the three limiting factors, I'd identified a solution. If I could afford Nikon's (£1000) 80-400mm VR lens, the Vibration Reduction technology would enable me to shoot at lower shutter speeds, the improved optical quality would let me shoot at wide aperture and so I wouldn't need to raise the ISO sensitivity. Also, the longer focal length of 400mm would increase the size of the birds in my images.
By the end of the year, I'd sold some stuff and agreed with my family that I could pool the year's Christmas, Birthday and Father's Day presents and splash out on the VR lens.
Once again, I was making progress and having fun. I finally felt as though I had some photos worth sharing. I started uploading to birdguides.com and set up my own website. People even started buying photos from me, which came as a great surprise. At this point, I had everything I needed to build up a perfectly good collection of bird images.
Unfortunately, my obsessive nature being what it is, I started looking at what would be the ultimate gear for bird photography. I noticed that the leading photographers seemed to be using the Image Stabilized (IS) 500mm or 600mm lenses made by Canon. Not only did these have greater magnification, but their wide (f/4) apertures and superb optics meant they could use teleconverters to gain even more 'reach', whilst still making it possible to shoot hand-held.
I'd tried using a 1.4x teleconverter with my Nikon zoom lens, but the loss of image quality and autofocus speed/accuracy was just too great.
At this point, I realized that Nikon didn't have a longer lens with VR/IS technology, even though their 500mm and 600mm lenses cost more than the Canon equivalents. At that point, I couldn't afford any of these lenses anyway but, a year or so later, I had an unexpected bonus that meant I could finally order one of the ultimate bird photography lenses.
My research suggested that a 500mm lens would be on the limit of what I could hand-hold, so my preference was to go for one of these, rather than the 600mm. Since there was no prospect of Nikon launching a VR version of their 500mm lens (I asked them), I bit the bullet and switched to Canon. I bought a 30D body and 500mm lens, plus 1.4x and 2x extenders, costing a total of £5500.
Lessons: If it's something you really want to do, it's surprising how you can find ways to make it happen. If you really get hooked, you could end up being prepared to spend vastly more than you planned, so don't ignore your upgrade path. Contrary to what camera magazines would have you believe, you should select your equipment based on the entire system, especially the lenses, not the camera bodies. In fact, camera bodies change every year, whereas the key lenses change only every decade or so.
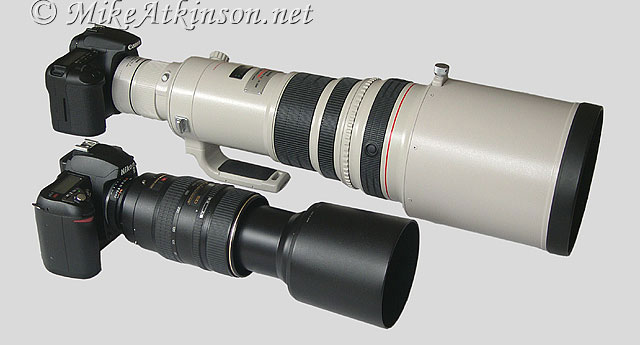
Equipment I've used for bird photography: Nikon D70 with 80-400mm zoom lens (bottom), which I upgraded to the Canon 30D with 500mm f/4 IS lens with 1.4x converter (top) (photo: Mike Atkinson).
Phase 5: Digital SLR and 'Pro' lens
Having spent such a huge amount of money on my gear, I then spent a month losing sleep wondering what I was thinking of. I also became aware of some of the difficulties involved in using this gear:
- previously, I'd take my camera everywhere 'just in case', but with something of this size and weight, I just couldn't any more
- it attracts a lot of attention, which can cause problems and can limit the places you'd want to use it
- the inability to focus closer than around four metres causes lost opportunities and the diameter of the lens means it can be very difficult (and sometimes impossible) to use through a hide window
- the high magnification can make it difficult to locate and track your subject, especially for flight shots, and can emphasize atmospheric conditions, such as heat haze.
Gradually, though, I realized that the results I'd been getting were greatly improved and that many of the birds I was photographing would have been beyond the range of my previous gear. Importantly, I found that the extra reach meant that I could photograph birds from outside their 'circle of fear'. Previously, a typical situation would be that I'd see a bird and start moving closer to it, but not so close that it would be disturbed by my presence. In most cases, this would be too far away to get a decent-sized image of the bird. With the new gear, though, I was able to take shots of the bird happily preening, feeding, and generally behaving naturally, which makes for much better photographs.
I found that I could use the 1.4x teleconverter to turn my 500mm lens into a 700mm lens, whilst retaining good image quality and autofocus/IS operation. With the 2x converter, though, I lost autofocus operation, so have never used it.
Incidentally, I also found I needed a backpack to carry around my gear. The only one I could find that would take my camera body plus lens and converter was the Lowepro Lens Trekker 600AW. Although I do have to remove the lens hood to fit this in, it works very well and even makes it possible for me to go out on my mountain bike with it on my back, giving me even greater mobility.
One of the key steps forward I took at the point when I bought my Canon gear was to start shooting in RAW format and using the bundled Canon Digital Photo Professional software to convert images to TIFF format before final processing in Photoshop. This gives a major boost to control and flexibility during processing. I also recently started to use the NeatImage tool to reduce the amount of digital noise in my processed images. One of the things I didn't anticipate was the amount of time I'd spend on learning how to use image processing tools effectively.
Lessons: You don't need a pro supertelephoto lens to photograph birds but, if you can afford one, these do have major advantages that outweigh their drawbacks. You can have a lot of fun using the cheapest of DSLR gear and can take high-quality photos with mid-range gear. In the end, though, having even the best equipment will not make you a good bird photographer any more than having a good set of paintbrushes would make you a good artist!
Phase 6: The future
In truth, I haven't felt any great need to buy more equipment since my big blowout a year and a half ago. If anything, I'd be tempted to upgrade my camera body to get a higher resolution sensor (more megapixels), better high-ISO noise performance and improved autofocus accuracy, but I'm not convinced the current-generation bodies are a worthwhile upgrade, so I'll hold off on that for a while.
For flight shots and general portability, I'm also tempted by Canon's 400mm f/5.6 lens or, alternatively, their excellent 300mm f/2.8 lens, which would also be great for close-up work.
At present, I enjoy the mobility of purely hand-held shooting, but I know that many photographers swear by sturdy tripods with Wimberley heads, so I'd consider trying that approach at some point.
Lesson: No matter how much equipment you get, there will always be other goodies to tempt you so, at some point, you just need to switch your attention from your equipment to your images!
Recommendations for new bird photographers - Nov 2007
Based on my personal experience and keeping in touch with equipment reviews, my recommendations for people just starting out are as follows. I've specified the time of writing here because products - especially camera bodies - are replaced frequently, and prices change every month.
Ideal starter kit
Until you know that bird photography is something you'll take to, start with some reasonably priced gear that you can upgrade or sell later.
Although Nikon has recently announced VR (Vibration Reduction) versions of its long lenses, I still believe the Canon system provides the best upgrade path for bird photographers, and is the system used by the vast majority of serious bird photographers.
Canon's current entry-level DSLR is the 400D (ignore the older 350D now), which you can buy new for under £400, with a 1GB CF memory card. If you can afford more than that, you are better putting the extra money into your lens, rather than a higher-spec body. Similarly, buy the camera in body-only form, rather than as a kit, so you can put the extra money into a better lens, and don't be tempted by any other gear at this stage.
If the camera body has used up most of your starter kit budget, you'll find there are a range of zoom lenses that go up to 300mm focal length from around £100. Have a look at the ones from Canon, Sigma and Tamron: they're not great lenses, but they'll give you a good taste of what's involved. Avoid anything with less than a 300mm maximum focal length.
If your budget allows, the cheapest really sharp lens is the Canon 400mm f/5.6 at just over £800. There are several zoom lenses that go up to 400mm or 500mm at just below this price point, but these would be greatly inferior optically.
Another popular lens choice is the £1000 Canon 100-400mm IS zoom. Although not as sharp as the 400mm lens, this does have image stabilisation which is useful in lower light levels. In theory, the variable focal length also adds flexibility but, in practice, you'd use it at the 400mm setting virtually all the time.
Finally, the £900 Canon 300mm f/4 IS lens is also popular. This is a sharp lens which can be converted to a 420mm f/5.6 by the addition of a 1.4x converter, whilst retaining image stabilisation and autofocus functions. With the converter, however, it will not be as sharp as the 400mm f/5.6 lens and, without it, the 300mm focal length will leave you struggling for reach on any birds you can't approach very closely.
Budget starter kit
The prices listed above are from reputable UK-based mail order companies. Prices in high-street camera shops would be higher, although some will do price matching.
If these prices are too high for your budget, it is possible to buy similar equipment, either new or used, at considerably lower prices, e.g. on eBay. A DSLR plus lens can be purchased for as little as £200, albeit with some degree of risk.
If this is still above your budget, the best thing I could recommend would be to pick up a cheap digital compact for anything from £50 upwards and just have a go at photographing birds that you can get close to, such as wildfowl at your local lake or captive birds. This can still be fun and will certainly make you appreciate it if you later manage to upgrade to a DSLR outfit. If you have a spotting scope, you can, of course, use any digital compact (or even a camera phone) to have a go at digiscoping.
Upgraded kit
If you've practised with equipment like the ideal starter kit above and are now looking for an upgrade, you'll soon realize that there is a big gulf in the available lenses of at least 400mm focal length, stretching from the £1000 level right up to £4000. The only lens in this price range is the £2500 Sigma 500mm f/4.5, which is good, but not spectacular. This gulf has caused frustration for many bird photographers, who have concluded that they need to stick with their sub-£1000 lenses until or unless they can afford to spend around £4000 or more on a Pro lens.
At that point, the options are as follows (all have superb optical quality):
- Sigma 300-800mm f/5.6 (£4100): Extremely big and heavy, with no image stabilization
- Canon 600mm f/4 (£5500): Big, heavy and expensive - the ultimate 'no compromise' lens
- Canon 300mm f/2.8 (£2900): Good portability, but short focal length
- Canon 400mm f/2.8 (£4900): Big, heavy and expensive, and only modest focal length
- Canon 400mm f/4 (£3900): Good portability, but no cheaper than the 500mm, which has significantly greater reach
- Canon 500mm f/4 (£3800): Felt by many bird photographers to be the best compromise between reach and portability.
If you're lucky enough to be able to buy any of the Pro Canon lenses, the £200 1.4x teleconverter (extender) is a must. The f/2.8 models can also take the 2x extender without loss of autofocus. If you have a high-spec. camera body, you may be able to get autofocus with the 2x extender on f/4 lenses.
In terms of camera bodies, the £750 Canon 40D is a worthwhile upgrade from the entry-level models, especially in the areas of build quality, autofocus capability, noise reduction and continuous shooting.
Most bird photographers ignore the bodies with full-frame sensors (currently the 5D and 1Ds MkII/MkIII) because they don't have the effective magnification increase resulting from bodies with smaller sensors.
The ideal bird photography camera body at present is the £2700 Canon 1D MkIII, although many problems have been reported with the new autofocus system used by this camera.
Use of flash
Another question I'm sometimes asked is whether flash can be used to overcome the problems of low light in bird photography. In general, I think the answer to this is 'no'. Flash units, especially with a beam focuser, can be used to provide a 'lift' to poorly lit shots, but only at a lower intensity than the ambient light, otherwise the images have an ugly, unnatural look. It is possible, under controlled conditions, to simulate daylight through complex, multi-flash setups, but this is not something to tackle until you are able to take good photos under natural lighting conditions.
Equipment for image processing
You don't need special computer equipment to process bird images. I'm still using a three-year-old PC, with a 19" CRT monitor as its only upgrade. Current budget desktop packages, which you can buy for under £400, are perfectly adequate for the job, as are any current models from the Apple Mac range.
I strongly recommend that you get a broadband Internet connection so that you can make the most of the Internet as a learning resource and publishing mechanism.
I also recommend that you take regular backups of your work, for which I use a combination of DVDs and Western Digital external hard drives.
I've found the most valuable PC component is a decent monitor with a good range of adjustments. To get accurate colours, I use a monitor calibrator (the £140 Monaco X-Rite), but this does need you to be able to change the monitor's colour and other settings.
For image editing, I use a graphics tablet. This is not essential but, if you're doing a lot of selective editing in Photoshop, the £220 Wacom Intuos3 A5 tablet is excellent.
Software
Eventually, you'll want to use the latest version of Adobe Photoshop for image editing. This costs a few hundred pounds but, fortunately, a cut-down version - Photoshop Elements - is available for £70 or less to get you started. Importantly, this works the same way as the full version, so upgrading is a relatively easy process.
To start with, I recommend you use as few software tools as possible. Each one of these takes a lot of time to learn, so you need to keep things as simple as possible.
I strongly recommend that you shoot in RAW format, in which case you will need to convert your images to TIFF or JPEG format before processing them in Photoshop. For this conversion, I use the Digital Photo Professional software that comes free with Canon DSLRs, but you can alternatively do this in Photoshop itself, or in other independent RAW conversion tools.
For noise reduction, I use the NeatImage Pro+ tool (which integrates with Photoshop and costs around £40) but, again, you can alternatively do this in Photoshop itself. Once you've familiarized yourself with your image-editing software, you'll develop a 'workflow' for processing your images: cropping, resizing, adjusting brightness, sharpening, etc. This can be very basic to start with, but can be optimized later to give better results and faster operation.
I recommend getting as much help as you can to learn about image processing. I learnt this the hard way, but could have saved a lot of time by getting someone to teach me.
Printing
If you want to print your images, you can get fantastic results from some of the current A4 or A3 inkjet printers from the likes of Canon and Epson (I now use a Canon printer because I've had print head clogging problems with Epson models). Avoid the cheapest printer models, because these are false economy in the long run: go for a photo-optimised printer with at least eight inks for best results.
Make sure you use the manufacturers' own inks and the best possible photo paper and, after a bit of experimentation, you will be getting great prints that will last for decades.
Conclusion
You've probably realised by now that bird photography can be an expensive activity.
There are some plus points, though:
- it is possible to start small and build up if you get hooked
- digital cameras save you a fortune in film and processing costs compared with cameras of the past and can also be used to take great general photos, such as family and holiday shots
- you may already have a suitable computer and printer and, if you don't, buying these will enable you to use them for other purposes
- if you build up a good collection of images, you can start to publish and sell them, which can give you a real buzz; if you reach a certain level, your hobby will pay for itself and can even give you an income
- wherever you take your bird photography, you will almost certainly get a huge amount of enjoyment and satisfaction from it.
Whatever camera gear you can get your hands on, give it a go! You'll never know how much fun it can be until you try it.
Next month: Camera settings
Digital SLR cameras have a bewildering array of settings. Getting them right can make a big difference to your bird photographs and can make producing them much easier. Next month's tutorial explains which are the best settings to use, and why.
